So I’ve wanted to make a knife for some time and was looking for an easy kit that wasn’t going to require a huge investment in new tools. As it happened, I was at the local Woodcraft store and found a knife kit that seemed easy enough. The cost of the kit was $20.99.
Here’s the product detail from the Woodcraft.com site:
These knife kits are constructed from 1/8" 440C Stainless Steel with a hollow ground and highly polished blade section. Just shape, mount and finish your custom handles for a one of a kind, high quality knife kit. Kits include blade, aluminum scale pins and instructions. Made in China.

- 440C Stainless steel blade
- Custom fitted sheath
- 3 aluminum pins
- 3" 3/4 inch blade
- 8 3/8" overall
Since the kit did not include the handle material, while in the store, I picked up a pair of Rosewood Bolivian knife scales which measured in at 3/8” x .5” x 5” each. The scales come packaged together at a cost of $4.99. Total cost for the material to make the knife was $25.99 plus tax. After getting home, I used the knife blank to trace the outline of the handle. Using two sided tape, I put both scales together and made my preliminary cuts with a reciprocating saw. I know that this was not an ideal tool but this was what I had available to me and my plan was to not buy any new equipment. Once I cut the scales to the general shape, I drilled the required holes and then epoxied and pinned the scales to the knife. Here is when things got very tough… Trying to remove so much handle material to be flush with the tang was a nightmare… even using 60 grit sandpaper.

Regretfully, I went out and bought a dremel; however, this made life easy and in no time I had the scales flush to the handle. The dremel was also handy in removing the extra length on the pins. Once this was accomplished, I proceeded to shape the handle to my desired width. After getting the grip to my liking, the last step before sharpening the blade was to soak the handle in boiled linseed oil overnight. Sharpening the blade was a challenge due to the factory edge being uneven. However, after about an hour on my Japanese water stone (1000/6000 grit) I was able to re-profile the blade to have a convex edge. Finishing the edge with a leather strop gave the blade a super sharp edge. I had my doubts with this Chinese steel, but, overall the edge retention on this 440C steel seems acceptable. After spending 2 hours, making feather sticks, cutting and whittling wood and cutting up vegetables—camp related chores—the blade was still sharp enough to slice through paper. I was quite pleased.

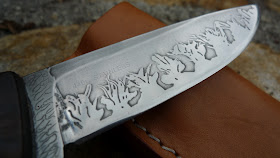
The leather sheath was formed simply by wetting the leather, sticking the knife in the sheath and then forming with my fingers. Now after the leather has dried there is very good rention of the knife when sheathed. To finish off the sheath I lathered it with shoe grease and then buffed it by hand. The knife comes with a mirror like shine, but, you can see that I added etching to the knife blade. This was an interesting process that I will go into at another time. Overall, not bad for less than $26 and about two days investment. Now I have another full tang knife that is functional, looks attractive and one that I would not hesitate to carry. I highly recommend this project to anyone. ~Keep it Sharp.