Urban and Outdoor Preparation, Product Reviews and General Discussions about Living near and Enjoying the Blue Ridge Mountains of Virginia.

Saturday, May 25, 2013

Condor Nessmuk Knife Review and George Washington Sears


George Washington Sears who is also known by his pen name Nessmuk wrote a book in 1884, simply  titled Woodcraft.   This book is available for free in either .pdf or e-book format from a variety of sources including the Gutenberg Project.  The book itself is a short read which provides an interesting picture and perspective of this man’s view of life in the outdoors during the late 1800’s.  In many ways, the book reminds me of an 1884 version of YouTube in book form.  Nessmuk writes to chronicle some of his musings of wilderness outings and pokes fun of those who are less experienced than he.  At the same time, however, he provides information and reviews on important matters of woodcraft including details on the gear and equipment he carries, the appropriate types of shelter, how to build a campfire and how meals are to be prepared.  It appears that Nessmuk spent much of his adult life enjoying the outdoors, honing his craft and building upon his knowledge and experience.  Because of this, many consider Nessmuk the father of bushcrafting.  The book is an interesting read, and because it has some valuable information and is somewhat entertaining (and humorous), I would certainly recommend it. 

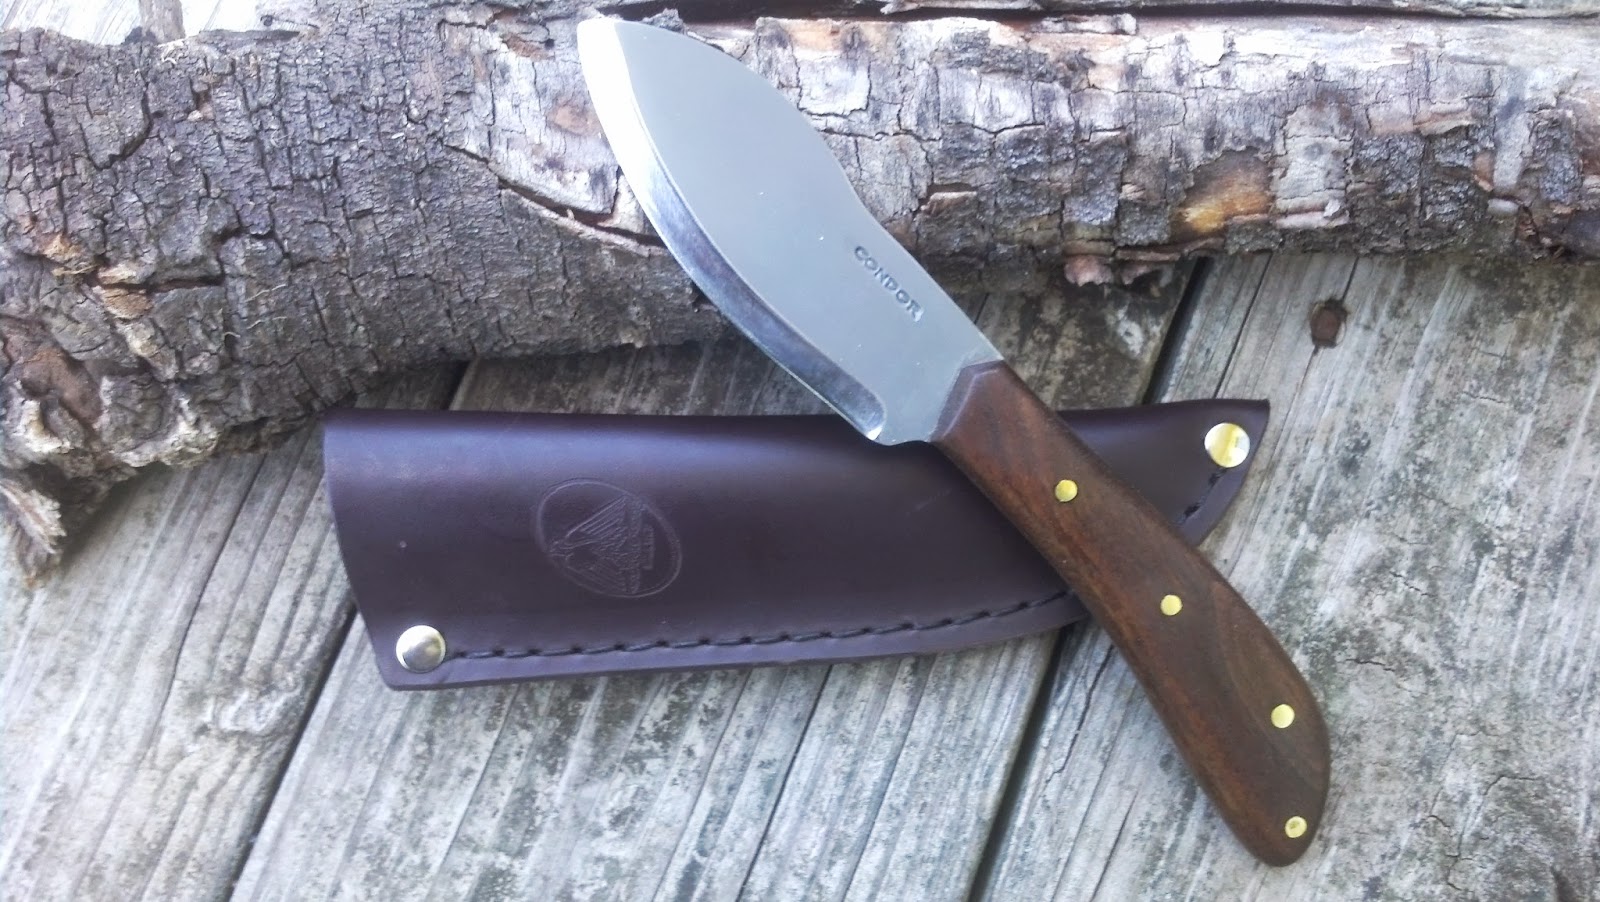
In tribute to the man Nessmuk and his book, I purchased the Condor Nessmuk.  The Nessmuk knife is a copy of the skinning knife which George W. Sears carried.  It has an odd shape that is specifically designed for skinning animals, however, I have found that the design is equally capable of being used for light bushcrafting and camping tasks.  I purchased this particular knife through Amazon for a very reasonable price.  The Condor brand of knives has a reasonably good reputation although I have read and experienced that their quality control is suspect, at times.  Initially, I was a bit disappointed with the quality of the knife as I received it.  The handle material which appears to be walnut was uneven and the finish was rough.  The blade was not very sharp, however, I was glad that the edge of the blade came close to the handle.  Despite
its initial shortcomings, this knife had tremendous potential.  After a couple hours of work to get the handle smooth and honing the blade razor sharp on my Japanese waterstones, my new Nessmuk knife has become a very serviceable tool.  The 1075 carbon steel blade is easy to sharpen and holds an edge reasonably well.  I also applied several coats of boiled linseed oil on the walnut handle.  Overall, I am very pleased with the results, and quite frankly enjoyed the time I spent getting the knife to its potential.  There is no doubt this knife makes a terrific skinner; but, it is also a great camp knife for food preparation and for light processing of wood for fires.  I have no hesitation in recommending this blade and I plan to carry this knife with me in my pack.  For those who may be interested in purchasing this knife, I would recommend you looking at BaryonyxKnife.com; for a little more than what I paid, you will receive a knife that has been inspected and have an opportunity to choose their special grade option.   By the way, the sheath that is supplied is excellent and compliments the knife very well.  The Condor Nessmuk, a very serviceable knife in tribute to a man and his words.  ~Keep it Sharp.

Saturday, December 1, 2012

Sanrenmu 710 - Limited Quantities For Sale

**Knives are No Longer Available for Sale**


Sanrenmu 710 in Black and Silver

Back in June of this year I did a review of the Sanrenmu 710 folding knife.  You can read the review here: Sanrenmu 710-The Perfect Pocket EDC.  I continue to carry this knife on a regular basis because it is such an excellent knife; I'm confident that you too will find that it is the Perfect Pocket EDC.  I have been so pleased by this knife that I recently acquired 22 brand new Sanrenmu 710 knives; 11 each in Black and Silver.  I know that you can very easily find a cheaper price from other sources, however, you will most likely have to wait several weeks for your shipment to arrive.  But...  If you want one now, I have these knives available for $14.99 including immediate free shipping (USA Domestic only).  So why wait?  The price isn't unreasonable, the gift giving season is pressing upon us and if you order now you'll have the knife in just a few days.  These would make a great gift, stocking stuffer or personal purchase. Supplies are very limited, so don't miss out on this opportunity! I expect that these will go fast so send me a comment with your email address, full mailing address, and which color you want and the quantity so that I can verify the inventory.  I'll then send you a PayPal Invoice for payment.  After all of the knives have sold, I'll post an update.  ~Keep it Sharp.

Sunday, November 25, 2012

Straight Razor Shaving with a 3-Blade Disposable?

Is it possible to get a straight razor shave from a disposable triple-blade razor?  While the experience is definitely not the same; for, after all, there is a sense of manliness, nobleness and nostalgia associated with shaving with a straight razor; however, it is possible to replicate a pseudo-experience.  Now, I personally own several vintage straight razors which have been honed with a precision edge and each of these razors give the classic baby face closeness; so, don't misunderstand me...  I'm not saying that shaving with a disposable provides the same pleasure and experience.  Even so, I believe I have found a way to provide the same, consistent "close as a straight razor-like" shave with a disposable razor.  Especially when time and convenience is necessary, this technique is a winner.  And, there is a bonus from this setup, but first...

Here's the recipe for success:

Gillette Mach 3 (Sensitive) Disposable Razor
Shaving Brush
Shaving Soap
Soap Mug
Cotton Webbed Guitar Strap

The real secret and success to this setup is simply stropping the disposable razor with the cotton webbed guitar strap.  By stropping the razor 20-25 times before shaving, I have been assured a very close comfortable shave and dare I say, "as close as a straight razor-like shave".  So, here's the bonus...  I've been stropping and shaving with the same disposable razor since January 1, 2012.  With more than 10 months of using this technique, I am very comfortable and confident in recommending this method of shaving.  I purchased a 3 pack of the the Gillette Mach 3s for under $7 and having only used one razor, so far, I would consider this a real bargain.  Plus, there's no indication at this point that this same razor is anywhere near the end of its useful life.  By the way, this technique even works great for reviving razors previously used on your wife's legs.  So give it a try and let me know what you think.  ~Keep it Sharp.

Saturday, September 15, 2012

McAfee's Knob and DIY Tarp Project

I had been planning an overnight camp trip for a couple of weeks and was finally able to make it happen this weekend.  My goal was to try out a new homemade plastic tarp, sharpen up some bushcrafting skills and techniques; and most importantly, spend some time with one of my boys. The outing took place near McAfee's Knob which is located near Roanoke, Virginia.  The hike is about 8 miles round-trip but worth the effort once you get to the Knob; revealing one of the finest views in Virginia.

Having seen this DIY tarp on a YouTube video a few months ago, I was convinced that this was a project that had the potential of being very cost effective and easy to pack.  Completing the project was really quite simple and can be completed in less than two hours.  The material list in putting this project together is inexpensive and includes the following items:
  1. Husky 9 X 12 Plastic Drop Cloth (2mil) from Home Depot ($2.98)
  2. Duct Tape-40yards from Home Depot ($4.89)
So, there you have it...  for under $8, I was able to make  a reasonably lightweight and reliable homemade tarp that provides for more than adequate shelter.  The whole project took about 1.5 hours to complete. The most time consuming
portion was in reinforcing the plactic with the duct tape; this included both sides of the edge, the center line and the diagonals.  By adding the diagonal reinforcement, it seemed logical that this would reduce the stress of the plastic when putting on a load when staking and tying down.  In addition I decided to use duct-tape straps instead of grommets on the tie ends.   The hexagonal shape provides excellent coverage and the whole tarp weighs about 22 ounces.  The entire tarp rolls up to approximately 5.25" X 7". With the cost of sil-nylon tarps and the like, this really is a remarkable and cost effective alternative that won't let you down.  While the durability is yet to be determined, I can't think of a reason why this tarp wouldn't find a place in my pack on every overnight outing going forward. By the way, this was the first overnight with a hammock  Besides not having to sleep on the ground, there are definitely some pluses in selecting this type of sleep system.  I need to spend additional nights trying to optimize this method, so it may be awhile before I post my thoughts.  On the other hand, the DIY tarp and hammock combo complimented each other very well.  ~Keep it Sharp.


Saturday, September 1, 2012

Enzo Trapper Knife Review


Back in March of this year I purchased an Enzo Trapper Knife kit from Curtis at Omaha Knife.  This was a straight forward knife kit that turned out exceptionally well.  The knife purchased was in O1 steel with Curly Birch handles.  While I never got around to posting pictures of the completed project, the Blue Ridge Survival Blog header has had a picture of this very knife.   I’ve been so impressed by this knife, I ordered and received my second Enzo Trapper earlier this week. 

Specifications:

Blade:  Full tang O1 tool steel with Scandinavian Grind– The Trapper is also available at Omaha Knife in D2 (both Scandi and Flat Grind), and 12c27 Stainless.  I have no doubt that D2 and 12c27 are excellent steels, especially since the Enzo brand represents high quality.  I purchased the O1 because I find it works well for me; I like the carbon steel and in terms of quality, ease of sharpening and edge retention the O1 steel has performed flawlessly.  From the factory this blade arrives hair popping sharp.  This type of grind lends itself especially well to bushcrafting tasks and is one of the simplest edges to sharpen.

The Trapper in Curly Birch was the first
acquisition.
Overall Length:  8 1/4” from tip to heel.  Blade length is 3 3/4".  Blade thickness is 1/8”.

Handle Material/Scales:  Burgundy Linen Micarta

Sheath:  The leather sheath is excellent and of very high quality.  The leather used to form the sheath is thick and comes with a dangler.  

Putting it all together...

As I said, this is a straight forward kit.  The kit was packed very well from Omaha Knife with the contents having the blade, handle material, corby brass bolts and a leather sheath.  The customer service from Omaha Knife is excellent.  I ordered the knife on Sunday and received it Wednesday.  I consider that very fast since the order could not get processed until Monday morning at the earliest. 

The scales that I 
ordered came pre-formed and pre-drilled, so the handle material is simply epoxied to the handle end of the blade, bolted and clamped.  The epoxy that I used is T-88 Structural Epoxy and it has a cure time of about 24 hours.    The next day after the epoxy cured, a Dremel tool was used to remove as much of the excess length from the brass bolts as possible.  I then used a small file to finish the brass pins flush with the handle.  The Dremel was also used to remove the excess handle material so that it's flush with the tang; I then followed up with 400 grit sandpaper on the handle material to smooth everything and round sharp corners.  Boiled Linseed Oil was then put on the handle and allowed to dry overnight.  Even with the Micarta handles, the Boiled Linseed Oil worked well.  Since this knife has the Micarta handle, I intend for this to be my primary workhorse.  I know all of this seems over simplified, but it really is a very straight forward knife kit.  I’ve been very pleased by the overall results and it’s satisfying to have built such a high quality knife.  This is a great weekend project that won’t take all weekend, so I highly recommend it.   ~Keep it Sharp.

Becker BK14 Neck Knife-Survival Kit


Whether I go out on a back woods camping trip or a simple day hike, I think about being prepared for the possibility that I might be out longer than intended.  So anticipating the challenges associated with spending a few more hours, an additional overnight or even a few more days, should be part of our physical and mental preparation. 

With that in mind I think along the lines of Shelter, Water, Fire, Signaling, Navigation and Food.  One of the basic kits that I carry is a Becker Bk-14 Neck Knife to accomplish this philosophy of survival.  By utilizing ranger bands (or bicycle inner tube) it is simple to create a personal survival kit.  Here is what is in my kit:

Shelter:  With a personal survival kit such as this, whatever clothing we have on would be considered our basic shelter.  Hopefully we have dressed appropriately to anticipate the season and any changes in the weather.  

Water:  I’ve included a Plastic 1-gallon storage bag.  This can be used to retrieve or collect water in multiple ways.  I always carry a water bottle so even if it becomes necessary to treat the water by boiling; a plastic bottle will do.  


Fire: The fire steel and Vaseline charged cotton ball (in tin foil) will easily initiate a fire.   Of course the Becker knife is excellent for making feather sticks and processing wood to build the fire.  

Signaling:  A small proton light and signaling mirror meets this requirement.  The signaling mirror is made from an aluminum can and has been highly polished. 

Navigation:  A simple button compass will provide the means for navigation in the general direction to safety.  


Food:  Fishing line and a fly from my fly-fishing gear will provide the means for food if I’m near a stream.  Included is a safety pin, just in cases I need to use live bait. 

The para-cord used around the neck and the knife handle provides for about 10 feet of cordage which can be used for a number of items including fishing and trapping.  All in all a very basic, concise and lightweight kit that has a survival form factor that will facilitate success when necessary.  ~Keep it Sharp.


Friday, June 8, 2012

Knife Review of Sanrenmu 710 - The Perfect Pocket EDC


For the past few weeks, I have been trying to find the perfect folding knife that conveys function and style; and one that is easy to pocket for everyday carry (EDC) whether in my suit or on the trail.  While I know that no folding knife is perfect; at least for me, I believe I have found one that most certainly meets the requirements.  So, let me introduce to you the Sanrenmu -SRM 710 Pocket Folder.

Specifications:

Blade-8cr13MOV 57 HRC
Satin Polished Stainless Steel
Lanyard Hole
Razor Sharp
Thumb Studs Opening
Stainless Steel Pocket Clip 
Open- 6 1/2"
Weight- 3.25 oz.

Ease of Deployment – Deploying the blade is accomplished with one hand.  Out of the box, deploying the blade was stiff and slow.  However, after adding a touch of silicone lubricant to the pivot point and flipping the blade about 50 times, the deployment is now lightning fast and very smooth.   The stainless clip is particularly functional and easy to slip onto the front pocket of a pair of dress pants or jeans.  I’ve read that some have used the pocket clip as a money clip.  The blade is secured by a frame lock while in the deployed position with no blade play whatsoever.

Ease of Getting a Sharp Edge – I found the blade edge to be sharp out of the box; however, with the use of a Japanese waterstone and Leather strop, I was able to get a super sharp edge.  I prefer a convex edge on my knives; and this was easily accomplished with my sharpening setup.  The steel on this blade is quite incredible; in fact, I was able to get the edge to straight razor sharpness; where I was able to perform the hanging hair test successfully.  (See Video Below).  The  8Cr13MoV stainless steel blade is an excellent steel and it is amazingly reliable.  The edge retention is simply superb.

Edge Retention – Edge retention is always a concern for me because I want a blade that will be able to hold the edge throughout the day while being used in a variety of tasks.  With this particular blade I was able to create several feather sticks with little to no effect on the blade.  The edge developed no nicks or chips; nor was there any edge roll.  Even after cutting the feather sticks, the edge was able to slice through a piece of paper without getting hung up.

Style/Comfort – I know that beauty is in the eye of the beholder; however, I really appreciate the aesthetics of this knife.  The combination of weight and size makes this knife especially comfortable to hold while doing routine tasks.  The overall look and satin finish of the frame presents a classic style whether in a suit or out in the woods.   The overall design, coupled with the sharp blade provided comfort as I worked on the feather sticks.  The rounded edges of the frame made it so that hotspots were virtually unnoticeable.

The Sanrenmu 710 is available in a Satin Polished Stainless steel, Black TiNi Finish with Laser Etching. and a Camouflage pattern. Having reviewed the Sanrenmu 707 folding knife previously, I must say that I am impressed with the quality of both of these knives. Quality and economy go a long way, especially these days; and with these knives, there is no lacking in both function and style.  I'm pleased to say that the SRM-710 is now my everyday carry..  ~ Keep it Sharp.